Wildlife Photography #101

Wildlife Photography 101: Tips to Take Better Wildlife Photos – The way I learnt!!
(Please note that this is meant for beginners rather than professionals. If you are a pro, better exit here 🙂 or you will find it very rudimentary and boring, or give us some additional tips on making us better pros like you 🙂 )
Since ages, pictures of natural beauty be it landscapes, plants or wildlife is a very compelling subject to capture in images. If you talk to any wildlife shutterbugs, one thing they will share is the fact that capturing the wildlife on their cameras is one of the most thrilling forms of the craft. As compared to landscapes and plants, wildlife moves and they are most active at dawn and dusk—time when light is not always cooperative and hence makes it more challenging to take that amazing pictures of high quality.
In this blog, I will share with you some of the tips I have collected over the past couple of years in capturing beautiful wildlife images with my camera. BTW I will also try to put the budding wildlife photographers to move away from the Auto Focus mode as it is not the ideal for Wildlife photography. (Remember that your Wildlife photography is always in the morning or in the evening when clear sunlight is a challenge).
Prerequisites
First & foremost, you have to invest in a digital SLR (DSLR) camera If you are truly interested in wildlife photography (nowadays you can rent them too and in our WildTrails App, we will be listing all of all those vendors who will be renting these high end DSLR cameras and lenses along with the rental cost and what cities they will be serving). Most of the point-and-shoot models simply don’t have the reach you will need to safely photograph wild animals, and ultimately will lack quality when it comes to taking even a half decent photograph.
Then you need lenses. Most professional photographers I know recommend that you use at least a 300mm (35mm equivalent) lens for wildlife photography and atleast 500mm if you want to capture a good shot of a bird. (But no matter how much reach your longest lens gives you, you’ll always be left wanting more). Remember this law, a low quality lens on a high quality camera will result in bad image quality, but a good lens on a low quality camera can still produce good results
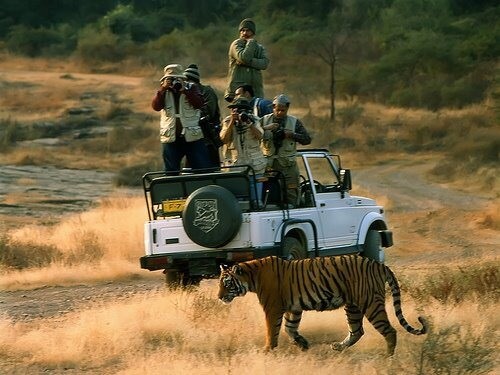
You are inside the Safari Jeep and now you have spotted an Animal (say the Majestic Tiger) and you are ready to shoot with your DSLR, stabilizing your camera inside the vehicle becomes very tough. Many use Tripods but most wildlife photographers find the tripod too constrictive, especially when photographing animals on the move. Also it occupies a lot of space and you don’t have that in a safari jeep. So your best friend in those situations will be a extremely lightweight (made of aluminium) monopod and/or you also buy a camera bean bag which you can place it on the handle of the seat in front of you and rest your camera on it to get the best shot. Remember the rule of thumb to eliminate camera shake.
BTW totally another point to note is that animals are inherently very sensitive to the shape and form of an upright human being than they are to vehicles. You can attribute this to the thousands of years we’ve spent hunting them for food. The fear that animals have for humans is well deserved. Best way for you to “hide” to photograph a wild animal is to stick yourself inside the safari vehicle (mostly open or closed Jeeps/Gypsies in India and also open Buses) rather than jumping out (Don’t ever try getting out of a safari jeep for a better picture). Some more cautious/shy animals will flee at the sight of a vehicle such as mouse deer for instance but many species feel much more comfortable around a vehicle than they do around people (especially I have seen many leopards and almost all of tigers) , especially in national parks where vehicles are a common sight, such as Bandipur, Nagarhole or Kabini.
Fundamentals
Now to fundamentals of the Shooting itself!! Three things you should know very well for a very good sharp picture are
- Aperture
- Shutter Speed
- ISO (sensitivity)
These three together are called the ‘exposure triangle’.
Aperture is a hole or an opening through which light travels. When you hit the shutter release button of your camera a hole opens up that allows your camera’s image sensor to catch a glimpse of the scene you’re wanting to capture. The aperture that you set impacts the size of that hole. The larger the hole the more light that gets in – the smaller the hole the less light. Aperture is measured in ‘f-stops’ or f/number, example f/2.8, f/4, f/5.6,f/8,f/22. Bigger the number smaller the hole is (very confusing but I learnt to live with that 🙂 )
Shutter speed is ‘the amount of time that the shutter is open’. In digital photography shutter speed is the length of time that your image sensor ‘sees’ the scene you’re attempting to capture. Shutter speed is measured in seconds (basically fractions of seconds). The bigger the denominator the faster the speed (ie 1/1000 is much faster than 1/30). When considering what shutter speed to use especially in wildlife especially if the subject is moving and you’d like to capture that movement you’ll want to choose a faster shutter speed.
ISO measures the sensitivity of the image sensor and is measured in numbers (100, 200, 400, 800 etc). the lower the number the less sensitive your camera is to light and the finer the grain. When shooting wildlife and want to choose a ISO, some of the things you should be aware are whether the subject is well lit?, you are using tripod or monopod, is the subject moving? If there is plenty of light, you are using a tripod and your subject is stationary you will generally use a pretty low ISO rating. If it’s dark, don’t have a tripod and/or your subject is moving you might consider increasing the ISO as it will enable you to shoot with a faster shutter speed and still expose the shot well. Of course the trade off of this increase in ISO will be noisier shots.
To Conclude with
Ideally start with Aperture priority mode (for wildlife photography), try adjusting the ISO and different f-stops and see and compare different images. With changing f, you will see even shutter speed changes. Don’t be afraid to increase your ISO to get the shutter speeds you need. When shooting fast-moving animals or birds in flight, you may want a shutter speed as high as 1/1000th of a second to freeze your subject. Experiment with different settings and see how they impact your images today. Happy shooting (with the Camera only please) 🙂
Wildtrails of India – “Uber Indian Wildlife Experience”
(We are Indian Wildlife Spotting, Sighting, Posting & Sharing mobile app which brings all of Wildlife Enthusiasts (WE) together to post/share their sightings, to connect, and to plan & book their next safari together (Safari Share). To facilitate all of this, brings all of Indian wildlife tourism ecosystem into one place (Wildlife Aggregator App) – Wildlife National parks, (bird & animal) Sanctuaries, Tiger & Elephant reserves, Wildlife Resorts, Wildlife tour operators & organized tours, Camera/Equipment Rentals, Cab/Car Rentals, Workshops, info about Indian Animals & birds and lot more. Currently we are concentrating only in Bandipur & Nagarhole (Kabini) with keeping all of Wildlife Enthusiasts from Bangalore. The app will be released soon and will be charged $5 but those who register to our Beta program, the app will be free; please do sign up for the program here at [email protected])
PS: Please be a responsible wildlife tourist; While in the forest – no littering, no sounds, no feeding, no getting down from the safari jeep, no calls (put your cell phones to airplane mode or switch off). Remember we are visiting their home and when we are there, let’s follow their rules.
With 4 years of Sightings data + Extensive expert tracker network in jungles, our customers had the best wildlife experiences.
Buy Wildlife Fashion Accessories
Exclusive Online Store for wildlife products
Packages
Packages Loading...
Recent Posts


